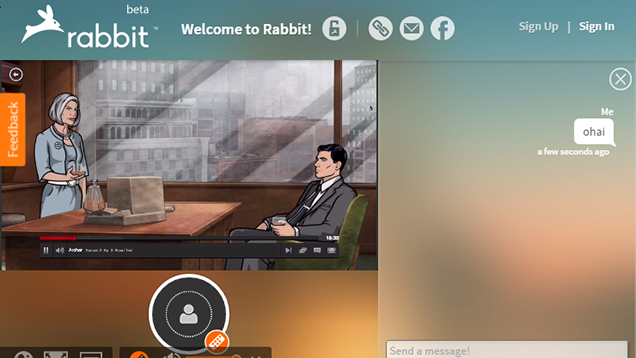
Rabbit Lets You Watch Netflix, YouTube, Browse the Web with Friends


Rabbit Lets You Watch Netflix, YouTube, Browse the Web with Friends
Chrome/Opera: Watching Netflix online with other people usually involves counting down and hitting play together. Rabbit gets around this by allowing everyone to watch the same feed together. The service supports Netflix, YouTube, Hulu, or anything that runs in the browser.
At its core, Rabbit is a group chat service with voice and video support. In that respect, it's not much different than Hangouts. Where it distinguishes itself, however, is by allowing you to launch a window where you and your other guests can watch things like Netflix together. As you'll quickly notice, what you're really watching is a small virtualized Chrome instance, so anything that can be played in a browser can be shared with your friends. It even has Adblock Plus pre-installed.
Source: http://lifehacker.com/rabbit-lets-you-watch-netflix-youtube-browse-the-web-1678199419?utm_campaign=socialflow_lifehacker_facebook&utm_source=lifehacker_facebook&utm_medium=socialflow

Buying a New Mobile? Check Out These Sites!

For how many times you want to buy a mobile (or for that matter any other gadget) but you are in a dilemma. Don’t worry since we live in WEB 2.0 era, so you can utilize the web by following these simple steps:

STEP 1- Check the prices of mobile through these sites considering your budget

.
http://www.fonearena.com/mobile_phone_pricelist.html
http://www.india-cellular.com/Handset-Prices.htm
http://www.indiagsm.com/phone_prices.php
http://mobilephone-price.blogspot.com/


STEP 2- Read detailed specs of your shortlisted mobiles & distinguish them on this basis.

http://www.indiagsm.com/
http://www.compareindia.com/products.php?sectionid=23
http://www.fonearena.com/brands.php
http://www.gsmarena.com/

STEP 3- If you are still on crossroads
, see expert reviews of the mobiles.
http://www.mobile-review.com *
http://www.mobileburn.com/
http://reviews.cnet.com/cell-phones/
http://www.phonearena.com/ *
http://www.gsmarena.com/reviews.php3 *
http://www.reghardware.co.uk/reviews/phones/
http://www.trustedreviews.com/mobile-phones/
http://www.tech2.com/india/mobile/
http://www.techtree.com/techtree/jsp/list.jsp?list=prodcat_review_cathome&prodcat_id=451
http://www.phonegg.com/

(*-Recommended)

Get Things Done Faster with these Microsoft Word Tips

Source: http://www.labnol.org/software/word-tips-tricks/28267/

Here are 10 tips and tricks for Microsoft Word that will help you get things done faster and more efficiently than ever before. I have created the animated GIFs with Word 2013 but the tricks will work just fine with older versions of Microsoft Office as well. Let’s get started.

1. Select Text Quickly

You can triple-click anywhere within a paragraph to select the entire paragraph in Word. Or press the CTRL key and click anywhere within the sentence to select the entire sentence.
You can also select rectangular blocks of text in a Word document, similar to the marquee tool in Photoshop, and apply formatting to the selected area. Hold down the ALT key and drag your mouse to select any rectangular area.
Select Rectangular Block

2. The Extended Clipboard

Word has a useful “Spike” feature that you can use cut (move) text and images from multiple locations in a document and paste them all at once to a different location.
To use Spike, select some text, images or other objects in your document and press CTRL+F3 to move that selection to the Spike. You can highlight and append more entries to the same Spike using the CTRL+F3 shortcut. Now press Ctrl+Shift+F3 to paste the content of the Spike anywhere in the document.

3. Move Around Faster

If you are working on a lengthy Word document, you can press the Shift+F5 keyboard shortcut to cycle through the spots that you have edited most recently. Also, when you open an existing document inside Word, the same Shift+F5 shortcut will take you to the location that you were working on when the document was last closed.

4. Change the Sentence CASE

Select some text in Word and press Shift+F3 to quickly change the case of the selection. It toggles between UPPERCASE, lowercase and Camel Case (first letter in capital) and should come handy if you’ve accidentally left the CAPS LOCK key on while typing.

5. Write Anywhere on a Page

Did you know that you can use your Word document as a whiteboard and write your text anywhere on the page. Just double-click wherever you want to type your text and start writing.
write anywhere

6. Convert to Plain Text

When you copy snippet from a web page into Word, all the styles and formatting are retained. There’s however an easy way to remove the styling from any block of text in Word – just select the block and press Ctrl+Space Bar and the rich text will be transformed into plain text.

7. Move Text without Copy-Paste

Most people use the Cut-Paste (Ctrl-x Ctrl-v) route to move text from one location to another within a Word document but there’s an alternate way as well. Highlight any block of text, press F2 and then place the cursor at the spot where you wish to move that text. Press Enter and the selection will be moved.

8. Insert Unicode Characters

If you know the Unicode code of a character, you can quickly add it to your document by typing the code followed by Alt+x. For instance, the code for Indian Rupee symbol is 20B9 – type 20B9, press Alt+x and the code will be replaced by the actual Rupee symbol.

9. Add Placeholder Text

There’s a Lorem Ipsum generator built inside Word to help you insert filler text anywhere inside the document. Type =rand(p,l) and press Enter to insert ‘p’ number of paragraphs each having ‘l’ lines. For instance, =rand(3,6) will generate 3 dummy paragraphs  with 6 lines each.
Lorem Ipsum Word
The other option is =lorem(p,l) that fills your Word document with pseudo-Latin text commonly used in web design projects.

10. Word’s Hidden Calculator

Your copy of Microsoft Word has a hidden calculator that can handle all the common arithmetic operations. You can write the Maths expression in your document, highlight it and press the Calculator button – the results of the calculation will be displayed in the status bar.
Go to Word Options -> Quick Access Toolbar, switch to All Commands and add the Calculate Command to your Quick Access Toolbar.


Written by Amit Agarwal, personal technology columnist and founder of Digital Inspiration. You can follow him on the social web or sign up for the email newsletter for your daily dose of how-to guides and video tutorials.

Save your Hard Disk Space by Optimizing Photos

Today digital cameras comes with mega pixels and one of the problem with these high pixels is that the size of the photo it occupies on hard is very much larger than normal ones, some of the photos are 3-5MB in size. If you maintain a good collection of photos on your hard disk, then it might take considerable amount of space as well. Photo Vacuum Packer is a free tool which frees up your disk space by optimizing your photos. The photo quality is not destroyed and more over you can select the max pixel size using this tool while optimizing.


You only need to select the folder and it can automatically include all the sub folders, find out the number of photos and their current size. In the settings page, you can actually chose whether you want high quality photos.


Now once you start the process what this tool does is optimize all the photos selected into a temp folder (you can change the temp folder) and then confirms you if you want to replace the optimized photos with the original ones. This is one special feature we liked about this tool. The optimization of photos are really good and the quality is top notch.


We tested this tool using 1GB of photos and the results are amazing, it optimized the photos without loss of quality to 314 MB, a saving of 70% of hard disk space. We would give 9/10 for this tool except for the fact that the tool is ad supported.

Download Photo Vacuum Packer

Source: https://www.facebook.com/note.php?note_id=476479185391

Convert Torrents To Direct Links And Download Them With IDM

Nowadays torrents are widespread for safe and robust public file sharing. Every body today uses torrents to share data to a large audience. But as we know downloading of torrents requires a torrent client to be installed on the destination machine or the machine that needs to download the content of the torrent. But at many places like schools, colleges, access to the internet by these torrent applications is disabled. So in those situations you can easily convert a torrent to a direct link and download it anywhere. These direct links also support download managers like  IDM.
How To Convert Torrent Files To Direct Download Links :
1. Download any torrent from any popular site like torrentz.eu or kat.ph or anyone of your favourite torrent sharing website. You can also copy the URL of the torrent file in case you know how to do it. Normal users must adhere with downloading of torrent file.
2. Go to zbigz.com. You will see a screen like below. If you copied the URL then paste it in the box and click the “GO!” button. Else click the  ”Upload .torrent file” button, browse the torrent file you downloaded and click the “GO!” button.
3. On the next screen you will be asked for the “Free” or the “Premium” option. As the name suggests premium is a paid feature with some added advantages. Choose free if you want to proceed without purchasing the premium package.
4. Now your torrent will be cached. It will take just a few seconds because zbigz caches the torrents at a much faster speed.
5. After your torrent is completely cached it will be available to you in a zip format. Click the .zip button. If you are a free user you may again be asked to choose from the “free” or the “premium” service. Just click the “free” button and your download will be started. If you have IDM installed as the default download manager then the file will be automatically added to the IDM Downloads queue.
Difference Between Free And Premium Service :
There is not a huge difference between the free and the premium service for a normal user. You get a benefit of speed with premium option if your connection’s bandwidth is more than 1.2 Mbps. Maximum size of the torrent can exceed 8 GB of size, which is not required in most of the cases. Your file will be available for 7 days in your account (free), we do not need it for more than that. You will obviously make a file only when you are going to download it. You can download 2 files simultaneously using zbigz. Here you can consider for a paid membership if you need to download a lot of torrents and that too simultaneously. Ads do not make a difference, so you can continue being a free user.
VERDICT
Converting torrents to direct links has many advantages. You can use any download manager of your choice, my favourite one is Internet Download Manager. You do not need to seed anything, that means it saves your bandwidth. The best part is that you get the maximum speed whatsoever, that means the website caches all the files in one go, it doesn’t really matter if there are no seeders when you download. Many of the files get stuck at the end because seeders stop seeding that file. This can never happen with the direct links. So visit zbigz.com and convert all the torrent files you want to download to direct links.
Source: http://www.tricks4web.com/2013/05/convert-torrents-to-direct-links-and.html

Viruses should be a concern for Mac users

Earlier this month Sophos released a free version of their product for the Mac, Sophos Anti-Virus for Mac Home Edition. Since then, they have been gathering data from their users. They recently released some statistics from the clients on their Naked Security Blog and found that users should be concerned about what might be hiding on their hard drive.


So far Sophos says that they have 150,000 Mac users and of those users nearly 50,000 have already reported finding malware on the computer. Interestingly enough the most common malware that the software detected was Mal/ASFDldr-A, a malware targeted at Windows machines. Mal/ASDFDldr-A takes advantage of a flaw in Windows Media Player which allows the infected media file to open a malicious web page rather than display the desired content.

They found though that the majority of attacks detected were Java exploits which are cross platform and were typically found in the internet cache on users computers. But lower on the list they did find some OS X specific pieces of malware OSX/Jahlav-C and OSX/DNSCha-E. OSX/Jahlav-C is a variant of OSX/DNSCha-E which happens to be a piece of malware that known as a DNS changer. When a DNS changer hijacks your computers DNS settings your web surfing can be almost completely compromised. Even if it looks like you are at Google.com and the page looks like Google's home page your DNS settings may have sent you to a server in China where malicious code is being executed in your browser.

The results show that the majority of files are more dangerous on Windows than on a Mac but that doesn't mean the virus goes away. If you plan to share files with a Windows computer it would be a good idea to maintain some sort of anti-virus protection just to be sure you are not spreading a virus to a more vulnerable operating system.


Source: http://www.neowin.net/news/viruses-should-be-a-concern-for-mac-users

A Free Utility to Backup all your Windows Drivers

windows hardware
When you buy a new PC, the vendor will almost always provide you with a “driver CD” that has the device drivers for all the hardware that’s inside your new machine. The CD comes handy when you are reinstalling Windows from scratch or are trying to recover your machine to its original state after, say, a system crash.
There are however two drawbacks with the driver CD.
First, you need to remember the physical location where you placed that CD months ago and second, it may have outdated device drivers. Hardware vendors continuously release new and improved versions of drivers but if you are restoring drivers from an old CD, you are bound to install the old and outdated versions which may be both slow and buggy.
An easy solution to this problem would be that you take a backup of all the device drivers that are currently installed on your system and put them on a CD or another drive. Double Driver is a free utility that can help you with this process.
windows drivers
Double Driver scans your Windows system and creates a listing of every since device driver that’s installed on the system. When you click the “backup” button, the tool will place all the drivers in separate folders – the modem drivers will be in one folder while the display related drivers will be in another one and so on.
This will make it easier for you to restore the relevant drivers without having to remember any of the file names and other technical details.
Double Drivers is available for Windows XP, Vista and Windows 7 and is compatible with both 32-bit and 64-bit edition of Windows.
Important: Double Driver is portable and requires no installation. However, if you are using it under Windows 7 or Vista, make sure you run the tool as an administrator (Shift + Right-click) or see this screencast.
நன்à®±ி : Amit Agarwal, www.labnol.org

Five Firefox Tips You May Not Know About

The thing I like best about Firefox is that just when you think you know everything there is to know about the browser, something new comes along and surprises you.
I discovered five new Firefox tips today. Maybe these are old hat and you know them already. Or maybe like me, you had no idea these could be done.
1. Quick search – without going to a search engine first.
Are you reading a website and you subsequently discover a word or phrase that you want to put into a search engine? Up until now, I would just open a new tab, type in the URL for Google and manually type the word or phrase in. But it seems there is a faster easier way.
Just highlight the word or phrase with your mouse’s left-click button. Then drag the highlighted text into the address bar in the browser. Then press “enter”. Firefox will now perform a “Are you feeling lucky?” Google search for you.
2. Delete visited URL’s
When you drop down the box underneath the address bar, you can see your recent browsing history. But what if you want to remove one URL from that list? Maybe you’ve been looking at a naughty site and you don’t want your girfriend to know? Or maybe you’ve been shopping for your loved one online and you want to keep it a secret?
Just drop down the URL box, highlight the URL you want to zap then press the “delete” button on your keyboard. The URL will then be removed from the list.
3. Navigate to browser tabs using the keyboard
Instead of using the mouse to click on a tab, why not use the keyboard instead? Pressing CTRL + TAB together will bounce you from tab to tab, starting from the one in the far left and working its way along. Or if you want to go to a specifc tab straight away, you can do that too. CTRL + 2 will take you directly to the second tab from the left. CTRL + 5 will take you to the fifth tab from the left.
4. Start downloads instantly
Instead of right-clicking on a download link, choosing “save to target” and pressing enter, just drag the download link to the “downloads icon” in the toolbar. The download will start automatically.
5. Grab files off webpages, even protected webpages
Have you ever wanted a picture, file or video off a webpage but you can’t, because it’s been protected? Just right-click on the page, choose “View Page Info” then the “media” tab. Find the file you’re looking for from the list and click on “save”. (note : this doesn’t work for everything but I have still had a pretty high success rate nonetheless).

thanks to www.makeuseof.com

WINDOWS 7 ROCKS

Loaded windows 7 ultimate on my laptop............ oh its so gr8....... much better than the old Vista.. the features are just tooo awesome.. u should get a feel of it to believe the words.. the taskbar of this operating system is the ultimate feature.. it so perfectly planned and designed.. know what.. “If you pin Explorer to the taskbar and start a copy, the explorer icon acts as a progress bar for the copy? So you can go to other apps and at a glance see how far your copy has to go just by looking at the icon”... Though this feature is just a minute one, microsoft team surely must be applauded for even thinking of such small stuff.. the other features of this operating system are well explained and compared in the following two links..

The Complete Review -- http://www.engadget.com/2009/08/12/windows-7-review/

Comparision between Windows XP/ Vista/ Windows 7 -- http://www.maximumpc.com/article/reviews/windows_7_review


Guys.. believe me.. this one is worth it.. it will surely displace XP and of course the rotten Vista..

How to Secure Your PC from Hackers, Virus and other Online Threats

Nine simple steps to build a more secure computing environments that save the precious data on your hard-drive from online threats and gives you a better working experience. [Based on Dell TuneUp software recommendations.]

1. Windows Remote Registry Service Disabled

Windows’ Remote Registry Service allows other users to gain access to your computer’s system registry and modify it. This is useful in situations where you require remote assistance. However, because this feature can create a major security risk, by disabling the Remote Registry Service, you increase your system’s security.

2. Microsoft Messenger Service Disabled

The Microsoft Messenger Service running on your computer can be used to send malicious pop-up messages that contain spam or viruses. By disabling this service, you increase your system’s security and protect it from external attacks designed to exploit this service.

3. Windows Automatic Updates Feature Enabled

The Windows Automatic Updates feature keeps your computer up-to date with the latest software updates and enhancements. The updates are delivered to your computer with minimal interference and require little or no action on your part. By enabling your computer’s Automatic Updates feature, you increase your system’s security and make sure that your computer automatically updates itself.

4. Internet Explorer Pop -Up Blocker Enabled

The Internet Explorer pop up blocker prevents pop up messages from appearing on your computer. These pop -up messages often contain malicious software or unwanted advertisements. By enabling the pop up blocker, you increase your system’s security and improve your Internet browsing experience.

5. Internet Explorer Security Settings Optimized

When your Internet security settings are below the recommended level, your computer is vulnerable to external attacks and security breaches. Changing your the settings to the Medium Level helps protect that your system whenever you use the Internet.

6. Microsoft Office Macros Security Optimized

Macros are user-defined series of instructions for a computer. Microsoft Office macros are scripts that are executed within an Office document (Word, Excel, etc.) to enhance the application’s capabilities. However, because macros may contain viruses or malicious code, by setting your Office macros security to the recommended settings, you make sure that you do not inadvertently infect your computer through a macro.

7. Browser Hijack Prevention Completed

Each URL address that you type into the Web browser is first translated into an IP address. This IP address determines which site is loaded to your browser. To translate the IP address into a URL name, the browser uses a local file called a hosts file. Occasionally, malicious software implants its own hosts file into your computer and directs the browser to this file, which may contain unsafe Web sites. By remapping your browser to the original hosts file, you increase your system’s security, protect it from external attacks, and ensure that you are directed only to the Web sites you intend to visit.

8. Suspicious Auto Run Files Removed

Auto-run files are files that start up automatically as soon as you access the directory where they are installed. Some auto -run files may be used to automatically run malicious code, and can make your system vulnerable to external attacks. By removing all suspicious auto -run files, you increase your system’s security and protect it from external attacks designed to exploit these files.

9. Windows XP Firewall Enabled

A firewall is software or hardware that helps block unauthorized users, viruses, and worms that could reach your computer over the Internet. Therefore, it is important to make sure you have a firewall installed and activated before connecting to the Internet, such as the Windows XP integrated built -in firewall. Activating the Windows XP Firewall with its default settings permits opening connections that originate from your computer, but blocks connections that originate from the outside. This makes it more difficult to attack your computer from the Internet. By enabling the Windows XP Firewall, you increase your system’s security and protect it from many external attacks.

Perform OCR with Google Docs – Turn Images Into Editable Documents

Google Docs can now perform OCR on digital images. You can upload an image containing typewritten or printed text (like a fax document or a scanned newspaper clipping) to your Google Docs account and it will turn that image into editable text.

In the following example, Google Docs successfully extracted all the text from a scanned book page and converted it into an editable document.

google docs ocr

The OCR feature in Google Docs is not part of the standard UI yet but you can use this sample form to upload scanned images to your Google Account and the server will automatically try to extract text from these images provided the image resolution is good and that the text inside images is written using Latin character sets.

The OCR feature can also extract text from noisy images as well (like this WSJ clipping) though the recognized text is not very accurate and the document formatting is lost (see conversion results).

If you are a developer, you can add the ocr=true parameter to your upload request and Google Docs will automatically scan that image for text patterns. You can also upload images to Google Docs without the OCR parameter but in that case, the image will be converted into a new Word document sans OCR.

Like Google Docs, Google Search too includes OCR features but the difference is that while Google Docs can extract text from images, the OCR in Google Search works only with scanned PDF files.

Put Live Desktops on Windows/MAC desktop

Internet Explorer has a feature called Web Slices that lets you track changes on certain pages from the favorites bar itself. Such a thing is not available in Firefox but you can use FireClip or Ubiquity and track portions of any web page in the browser – these portions could be from a Google results page, a customized view of your email inbox or even a live score card that you may have pulled from the ESPN site.

Now imagine if we could move out of the web browser and save these snippets of web pages on the desktop itself just like any other widget.

Add Snippets of Live Web Pages to your Desktop

webpages on desktop

What you see above aren’t static screenshots of websites but snippets of live web pages that will even refresh automatically after a set interval. They are created using Snippage, a free Adobe AIR utility available for both Mac and Windows.

Snippage, in simple English, lets you instantly turn any web page (or just a portion) into a desktop gadget (or widget depending on whether you are using a Windows PC or a Mac).

snip webpages

Snippage works like this – you open any web page using the built-in browser, select a rectangular portion on that page desktop by dragging around the handles and then click the scissor icon to crop that area and place it on the desktop.

If you are adding a stock chart or time-critical search results (say from twitter), you may want to change the refresh interval so that the clips reload automatically and you always have access to the latest information from your desktop.

Watch the video below to get a better idea on how you can create web clips for the desktop with snippage.

Screencast Video: How to turn web pages into desktop widgets


http://www.labnol.org/software/put-web-pages-on-desktop/10041/

http://www.labnol.org/internet/perform-ocr-with-google-docs/10059/

http://www.labnol.org/software/free-antivirus-software-from-microsoft/10070/

http://www.labnol.org/software/tutorials/how-to-secure-your-pc-from-hackers-virus-and-other-online-threats/833/

"Don't Panic!" Hides Windows From Onlookers

Windows: Have some windows you might need to stash in a hurry? Don't want your boss to catch you goofing off? Everyone needs a break now and then and Don't Panic! will help you keep your breaks discreet.

While most "boss-key" applications limit themselves to simply hiding specified applications at a keystroke, Don't Panic! strives to avoid being a one-trick pony by offering a wide variety of options for you to toggle.

You can activate Don't Panic! by either keyboard shortcut or, as seen in the screenshot here, by hitting the Don't Panic! button in the lower right corner of your monitor. You can adjust the transparency of the button or disable all together and stick to the keyboard shortcut.

Don't Panic! can simply hide the windows you have specified, even hiding the application from the Task Manager, or it can close the application either by terminating the process or closing it properly. You can also have Don't Panic! delete all the shortcuts in the recent files folder, dump your Internet Explorer history and temporary files, and purge the Recycle Bin.

One thing to keep in mind when using an application like Don't Panic! is that all of its powers are limited to changing things at the workstation you are sitting at. If your company, for example, enforces internet usage policies by monitoring the traffic coming from your terminal, Don't Panic! won't do anything to stop The Man from putting the brakes on your cubicle party.

Don't Panic! is open source, Windows only.

Get A Read Receipt When Friends Open Your Email Message

gmail read receipt If you are using Microsoft Outlook with Exchange Server, you can easily request read receipts and get notified when your email is opened by the recipient(s).

As such a tracking feature in not available in web email like Gmail, Yahoo! Mail or the new Windows Live Hotmail, here’s an extremely effective and free solution that works with every email program.

The service is called SpyPig and it will instantly send you a notification when your email is read by the recipient. The read receipt will also have other details like the IP address of the recipient and the exactly number of times he or she read your email.

Using SpyPig is simple – type your email address (where you wish to receive the notification) and they’ll give you a small tracking graphic that you have to embed in your outgoing Gmail message via a simple drag-n-drop (just like the Gmail Smileys). That’s it.

Now if you are worried about sharing your email address , read our previous email read receipt hack that shows you how to construct your own SpyPig kind of solution using Google Analytics or Statcounter.

The SpyPig trick however works only with Rich Text or HTML email, not plain text.

WinToFlash Turns Your Windows Installation DVD into a USB-Based Installer

Windows: Want to turn your Windows installation DVD into an installation flash drive? WinToFlash can do that and more.

WinToFlash can transfer Windows XP, Vista, and 7 onto a flash drive as well as Server 2003 and 2008. WinToFlash can also transfer Windows Preinstallation Environments to flash drive.

The process is simple and mostly obvious. You tell WinToFlash where the installation files you want to transfer are located and either let the transfer wizard take care of things, or specify settings like what kind of format the flash drive will undergo. In our test using a USB 2.0 generic flash drive it took about 12 minutes to turn a Windows 7 installation DVD into a USB-based installer.

WinToFlash is freeware, Windows only.

How to Transfer Mails from one Email Account to another for Free

move email accountsThere can be several reasons why you may want to switch email service providers.

Reason #1. Your existing email address gets too much spam so you plan to dump the old account and switch to a new email address (a form of email bankruptcy).

Reason #2. You are leaving your existing job for higher studies and need to transfer all personal emails from the Microsoft Exchange server to your new university email account.

Reason #3. Your ISP’s email service isn’t reliable and you therefore plan to move to a free web based email service like Gmail, Yahoo Mail, Hotmail, etc.

Reason #4. You think the new email service from XYZ Inc. offers more features than your existing mail provider and hence want to make the move.

Moving Emails from One Account to Another

This illustration will help you visualize how to transfer email messages across the three most popular web email services. The transfer will happen online and you just need to specify the credentials (user name & password) of your old email account (from where you want to move message out) and your new email address (where you want to move messages in).

online email transfer

Moving to Windows Live Hotmail

Windows Live Hotmail is integrated with TrueSwitch so you can easily transfer emails from Yahoo Mail, AOL, Gmail, Live.com, .Mac, etc. to your shiny new Hotmail address. The same service may also be used for copying old email from an existing Hotmail account to a new Hotmail address.

Moving to Yahoo Mail

Like Windows Live Hotmail, Yahoo! Mail too provides integration with TrueSwitch so you can easy copy mails from Gmail, Hotmail, AOL, Juno, Rocket Mail, etc. into your Yahoo! account. With TrueSwitch, you can also copy mails from one Yahoo! inbox to another without upgrading to Yahoo! Mail Plus.

Moving to Gmail / Google Apps

Gmail (or Google Apps for Email) has a built-in Mail Fetcher feature that lets you download email messages from 5 different email accounts that support POP access. You may therefore use this feature to move your old Hotmail or AOL messages into Gmail as both these service provide free POP3 access.

The migration from Yahoo! Mail to Gmail is slightly tricky but possible. Keep reading.

Trick: Move emails from Yahoo Mail to Gmail or Outlook without POP

The free account of Yahoo Mail doesn’t provide IMAP or POP3 access so you can’t move these emails into Gmail or a desktop client like Microsoft Outlook.

The Yahoo! Mail Plus upgrade will add POP3 access to you account at $20 per year but if you want to save some money, here’s an alternate but simple trick:

move yahoo to gmail or hotmail

1. Create a new account at Windows Live Hotmail and fetch all your Yahoo! mails into this account using the free TrueSwitch Service.

2. Now that your mails are inside Hotmail, you can setup POP3 configuration to fetch those Yahoo messages into Gmail via Hotmail.

Migrating Emails Away from your ISP Account

TrueSwitch mentioned above supports all popular ISPs including Comcast, Verizon, CableVision, AT&T, etc. but if your ISP is not in the list and you don’t have the time to configure your email client for POP3 or IMAP access, check out Yippie Move.

It’s a online email transfer service similar to TrueSwitch but supports an even larger number of email service providers including the .edu addresses of certain colleges and universities in US. With YippieMove, you can choose folders (or labels in Gmail) that you want to copy to the new location without having to move the entire mailbox. The service is quick and easy but costs around $15 per email account.

Copying emails from Microsoft Exchange / Outlook

Every organization has a different policy with respect to corporate email so check with the administration if your Exchange service offers POP3 or IMAP access – if yes, you can easily transfer messages into any of the free web mail accounts directly as listed above. Also see these guides:

Email Transfer Complete? The Next Step

Now that all your message have moved to your new email address, you can set up a vacation responder in your old email account to auto-inform contacts about your new email address. Also check this guide on how to manage multiple email addresses.

Source: Digital Inspiration Blog

Running a Windows Operating System on Browser

Windows OS – Made of Silverlight

windows os - made with silverlight

The site is windows4all.com and it feels like you are running an online copy of the Windows operating system in the browser. (Hit F11 to experience in full screen mode)

Windows4all not only replicates the look and feel of a freshly installed Windows Vista desktop environment inside your browser but comes with a variety of applications that are similar to the default applications included with Windows. These include Notepad, Windows File Explorer, Media Player, Calculator, Sidebar gadgets and even games like Solitaire and Spider.

Double click the IE icon on the desktop (or use the Vista start menu button) to fire up Internet Explorer and you’ll be able to browse the internet live inside this impressive Silverlight application.

It also includes a Notepad and when you save text files using this application, you can open the files again the next time you visit Windows4all on the same computer. You can install additional Silverlight applications into the Windows4all interface; you can pick the installers directly from from the internet or upload the files from your own computer into the Web OS.

windows desktop in the browser

If you are a Windows geek who is curious to know how this app was made, go to Codeplex and download the full source code. It would be neat if Microsoft offers some of these features, especially the ability to import Silverlight apps, to Live Mesh in the future!

Source : digital inspiration blog

Use Hibernate and Standby to Conserve Batteries

The Hibernate function in Windows XP Professional can make the batteries in your laptop computer last longer.

Windows XP supports the industry standard power management technology known as the Advanced Configuration and Power Interface (ACPI), which enables the operating system to control power to your computer and peripheral devices. The power management features in Windows XP include Hibernate and Standby. Hibernate saves an image of your desktop with all open files and documents, and then it powers down your computer. When you turn on power, your files and documents are open on your desktop exactly as you left them. Standby reduces the power consumption of your computer by cutting power to hardware components you are not using. Standby can cut power to peripheral devices, your monitor, even your hard drive, but maintains power to your computer’s memory so you don’t lose your work.

Power Management Performance

Windows XP wakes from Hibernate faster than any earlier version of Windows. So you can preserve your batteries without taking time to close all your files and shut down, and then restart and open all your files when you’re ready to work again. If you need to leave your computer, you can just leave it. Windows XP can automatically put your computer into Hibernate mode after a specified period of inactivity. Or Windows XP can detect when your batteries are running low, and then automatically put your computer in Hibernate mode to save your work before the battery fails. To put your computer into hibernation, you must have a computer that is set up by the manufacturer to support this option.

To automatically put your computer into hibernation

You must be logged on to your computer with an owner account in order to complete this procedure.

1. Open Power Options in Control Panel. (Click Start, click Control Panel, and then double-click Power Options.)

2. Click the Hibernate tab, select the Enable hibernate support check box, and then click Apply.

If the Hibernate tab is unavailable, your computer does not support this feature.

Power options


3. Click the APM tab, click Enable Advanced Power Management support, and then click Apply.

The APM tab is unavailable on ACPI–compliant computers. ACPI automatically enables Advanced Power Management, which disables the APM tab.

4. Click the Power Schemes tab, and then select a time period in System hibernates. Your computer hibernates after it has been idle for the specified amount of time.

To manually put your computer into hibernation

You must be logged on as an administrator or a member of either the Administrators or Power Users group in order to complete this procedure. If your computer is connected to a network, network policy settings might also prevent you from completing this procedure.

1. Open Power Options in Control Panel. (Click Start, click Control Panel, and then double-click Power Options.)

2. Click the Hibernate tab, and then select the Enable hibernate support check box.

If the Hibernate tab is not available, your computer does not support this feature.
3. Click OK to close the Power Options dialog box.

4. Click Start, and then click Shut Down. In the What do you want the computer to do drop-down list, click Hibernate.

If you are using Windows XP Home Edition, or Windows XP Professional with Fast User Switching turned on, the Shut Down menu will present the options to Stand By, Turn Off, or Restart your computer. Hold down the Shift key, and the Stand By button will change to Hibernate.